Best Low Light Indoor Plants: 10 Easy Care Houseplants
If your home light isn’t flooded with sunlight, don’t worry! Here are what we consider to be the best low-light indoor plants.
Not only will these ten favorite houseplants do well in low lighting conditions, but they’re also low maintenance too. Although some of them would do better in moderate or medium light, they’ll tolerate lower light levels just fine.
Let’s face it, few of us live in houses with multiple floor-to-ceiling windows and plentiful amounts of sun streaming daily. You might live in a studio apartment with only a few windows or a house with a few darker rooms.
Here are ten easy-care indoor plants for lower light conditions.
What Is Considered Low Light?
I see articles that say, “houseplants that grow in no light or houseplants that grow in the dark”. Not true. All houseplants require some light to grow, even artificial light. Plants need sunlight to photosynthesize and produce chlorophyll, making them green.
Keep in mind that low light does not mean “no light”. Otherwise, houseplants would look more like white asparagus, grown under layers of mulch and dark plastic to keep the growing conditions dark. More on low light levels below.
Remember, low light doesn’t mean no light. Many of these plants will actually do better in bright light but do tolerate low light areas. Dark rooms are not suitable growing environments for plants.
You won’t see much growth in lower light, but these plant picks are the ones I saw do and look the best over time with limited amounts of natural light when I worked in the interior landscaping trade.
I read somewhere that the general rule for low light is that you want it bright enough to see and to be able to do things like reading, sewing, or cooking. If you can, then these plants will do just fine. This to me is a good analogy so I wanted to pass it on.
Where to Place Your Low Light Plants
Below are general guidelines for exposure regarding low light plants for indoors. It’ll vary a bit depending on the number and size of windows (or glass doors) in a room.
- North facing: usually no direct sun but still some light. Plants can be close to the window(s).
- East facing: you want the plant to be at least 5′ away from the window(s).
- West or south facing: you want the plant at least 10′ away from the window(s).
None of these plants (or most houseplants for that matter) will take direct sunlight. The hot sun will burn them so keep them out of windows where they will touch the hot glass.
I tend to wing it when it comes to light. If a plant seems to be a bit unhappy, I move it. In the winter there is less light so you might have to move a plant closer to the light source or to a better light source. And, rotate your plants from time to time so they grow evenly.
Best Low Light Indoor Plants
My horticultural career started in the field of interior landscaping. I spent 12 years both maintaining and placing indoor plants on commercial accounts.
The plants listed below are the ones that I saw survive the best and the longest in offices, lobbies, hotels, malls, and airports. Low light, tougher maintenance environments indeed!
If you’re a beginning houseplant gardener, it’s best not to take risks from the get-go. Many plants don’t last long in our homes although you see multitudes of them sold at Home Depot, Lowe’s, Trader Joe’s, and the like.
You won’t find any new discoveries here, but my tried and true favs are listed below based on low maintenance, durability, and longevity.
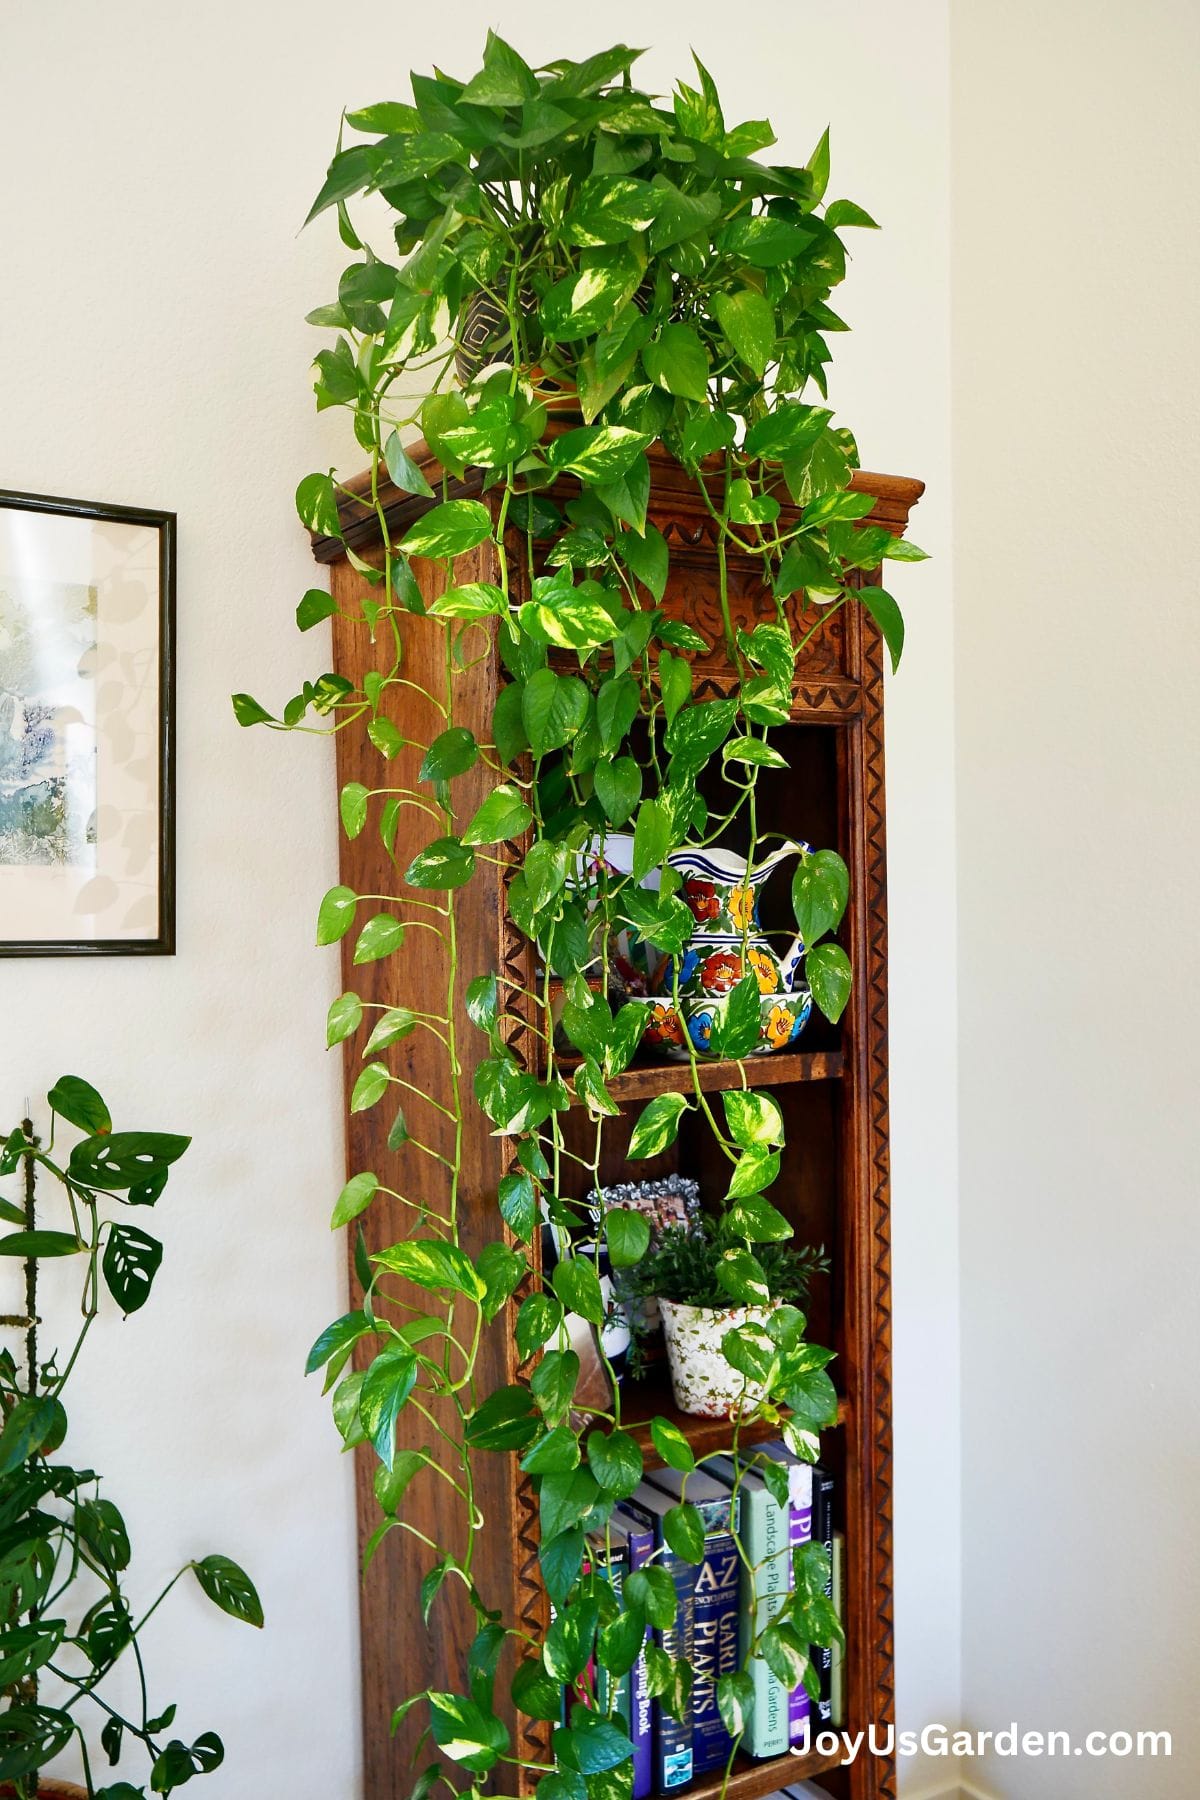
1. Pothos, Devil’s Ivy
- Botanical Name: Epipremnum aureum
- Where to place it: Hanging or on tabletops
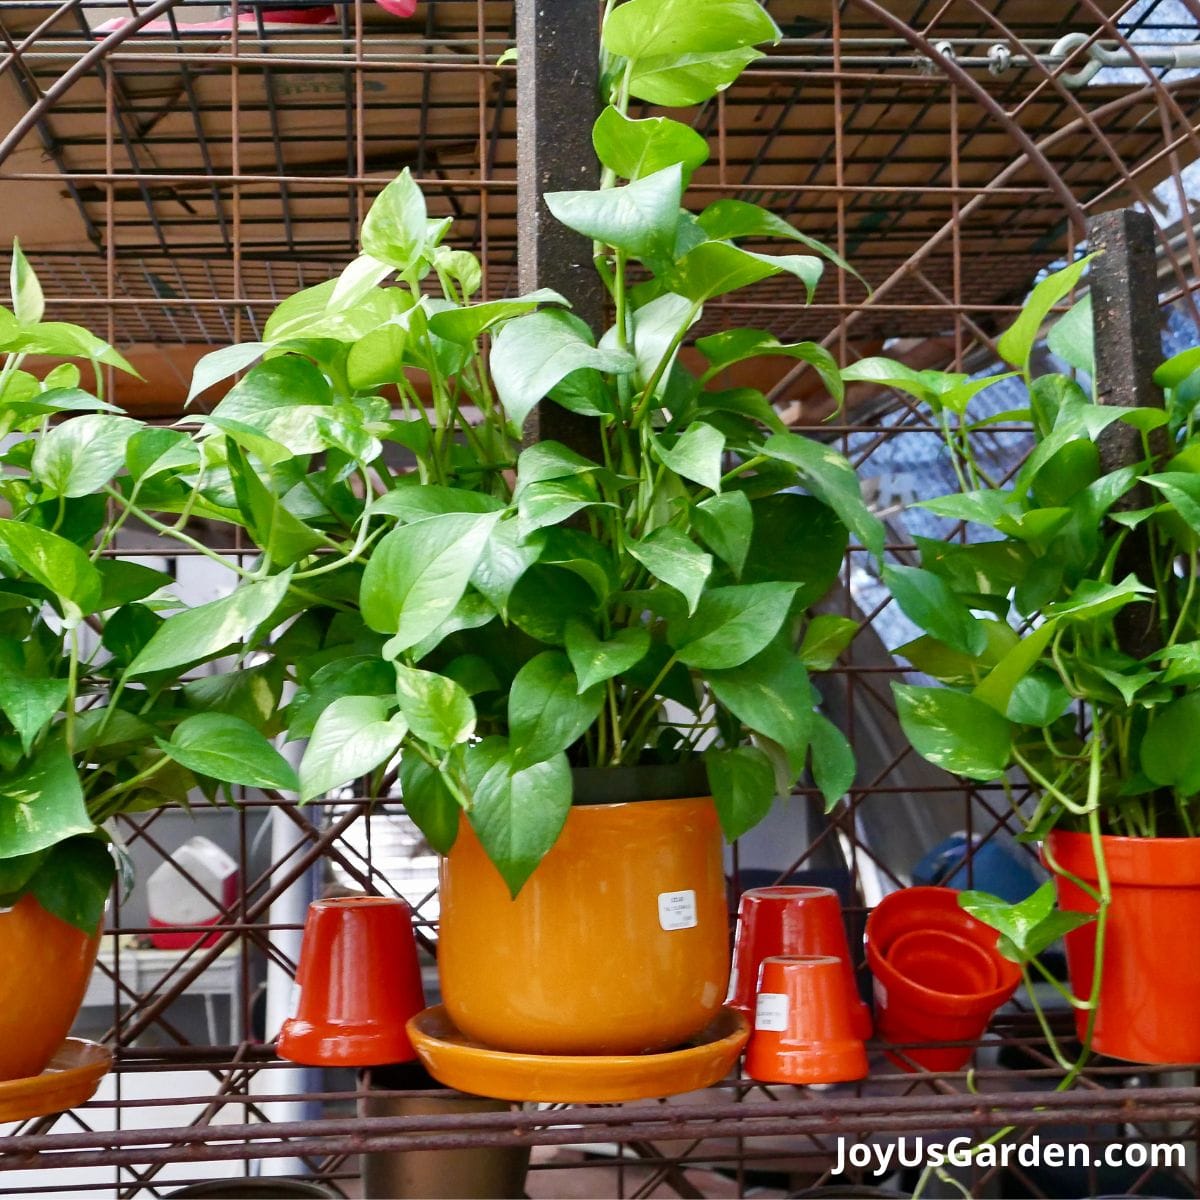
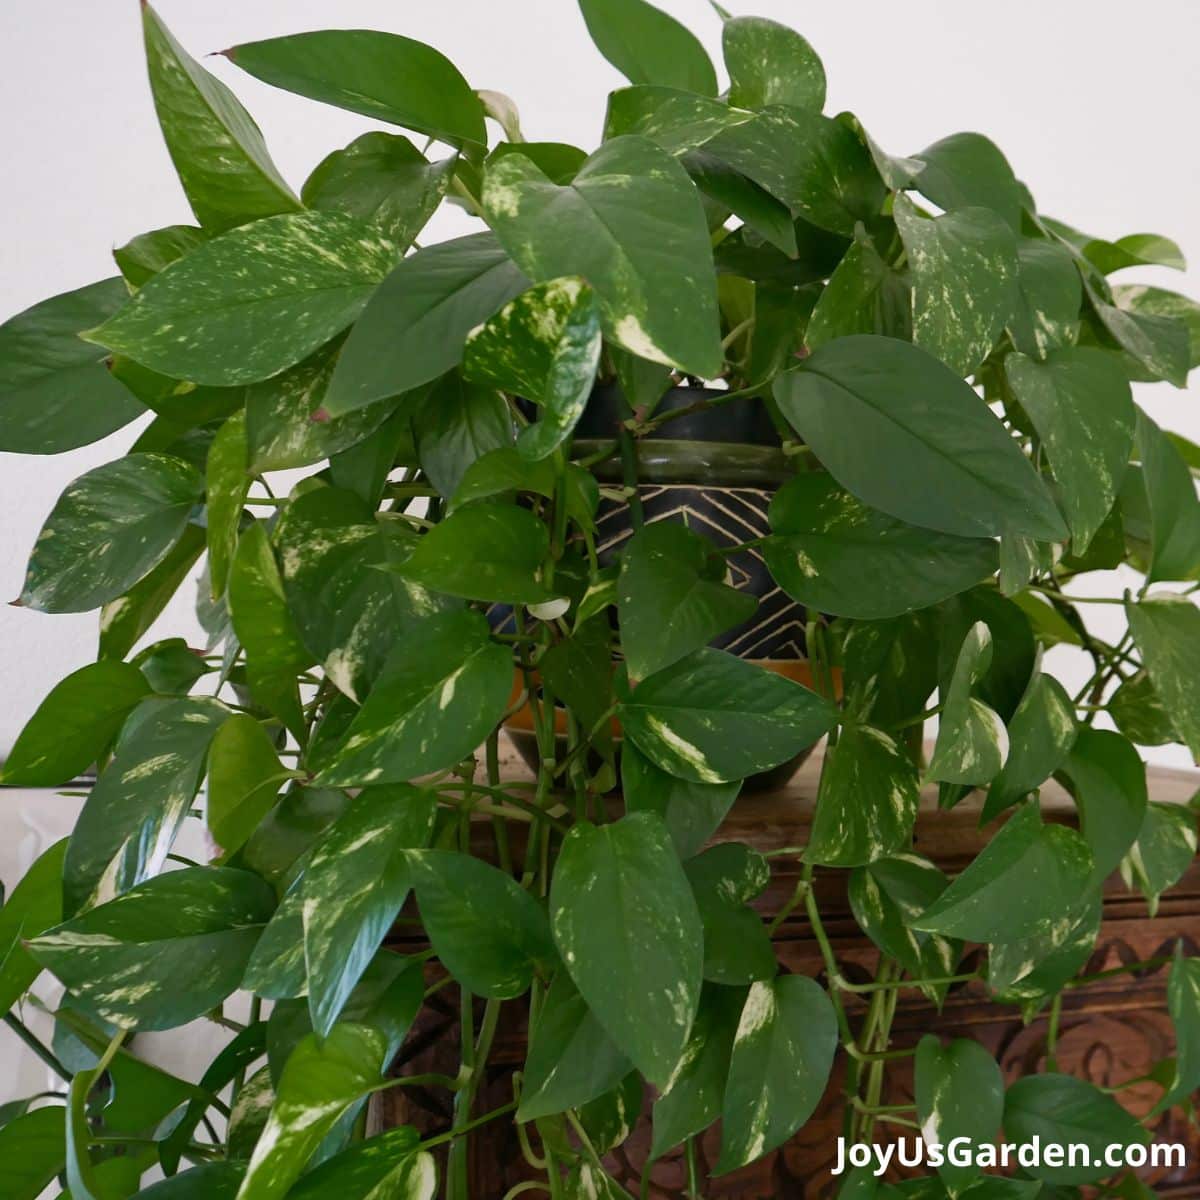
This is the quintessential hanging plant for lower light conditions. I’ve seen the trails reach 15′ long.
My Golden Pothos that sits on top of a shelf has 8′ trails although they’d be longer if I didn’t prune them twice a year. When a Pothos plant is happy, it grows like crazy.
However, the plant can become a bit thin and straggly on the top, and the long stems can lose leaves (usually in the middle) over time. That’s where pruning and tip pruning come into play to help keep it full.
Pothos are available in many different leaf colorations from green splashed with white to chartreuse to solid green.
The solid green one (Pothos Jade) does the best in low light. Just know that the other varieties of pothos with color and variegation (like Pothos EnJoy, Marble Queen, and Neon) will revert to a more solid green if not getting enough light.
Interested in more info on growing Pothos? Be sure to check out Pothos Care: The Easiest Trailing Houseplant, 5 Things To Love About Pothos, Pruning & Propagating A Pothos Plant, Neon Pothos Care, 11 Reasons Why Pothos is The Plant For You
2. Heartleaf Philodendron
- Botanical Name: Philodendron hederaceum
- Where to place it: Hanging or on tabletops
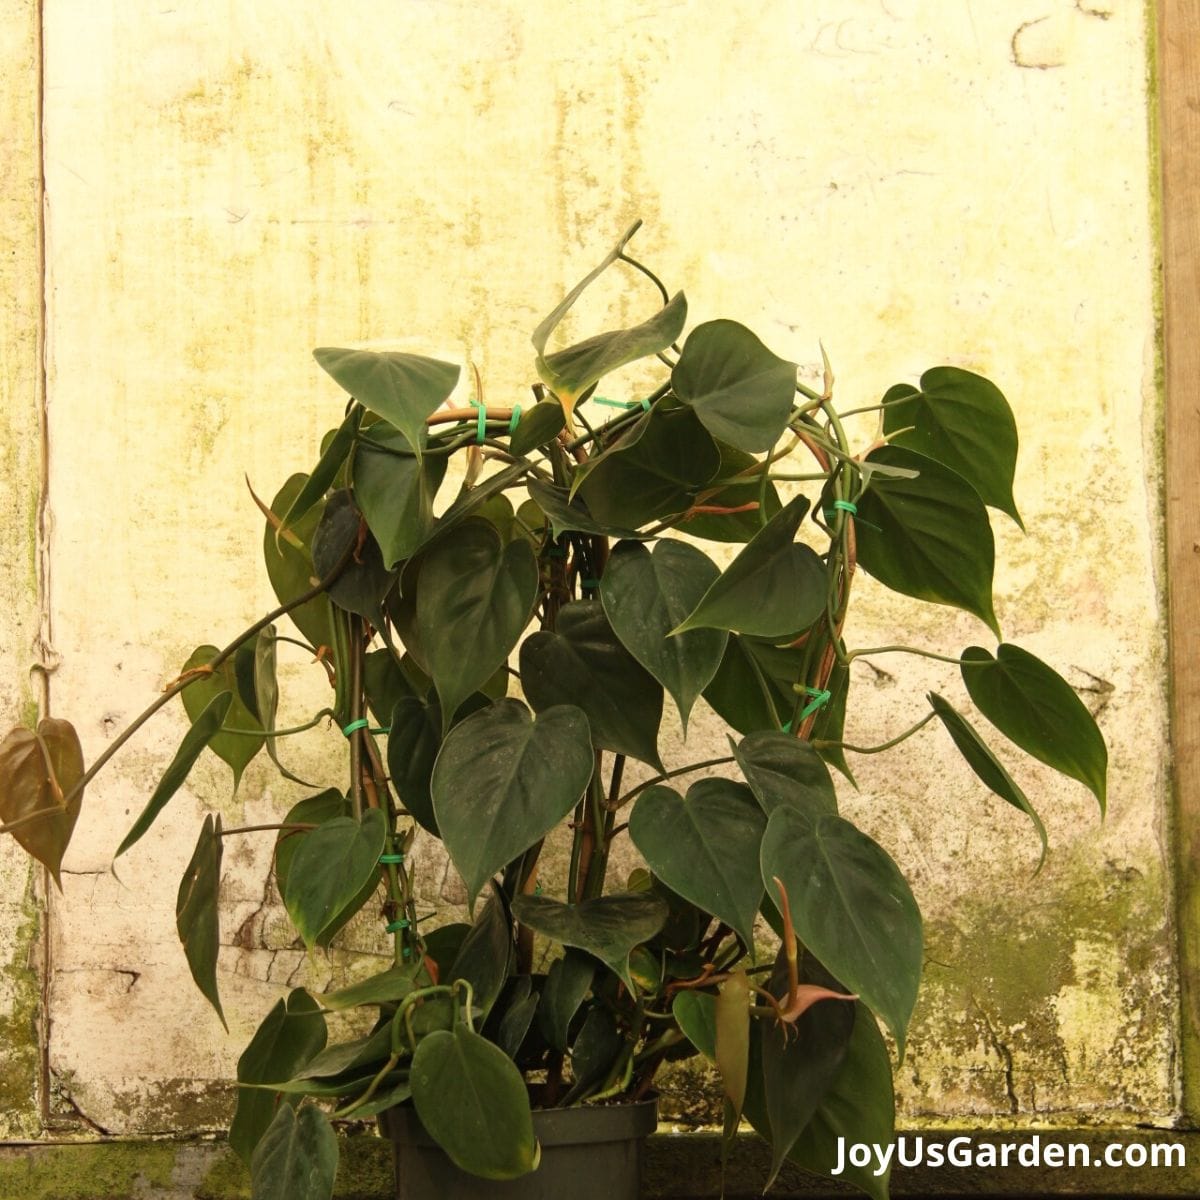
The Heartleaf Philodendron has heart-shaped leaves, just like the common name says. The longest I’ve seen the trails on this one is about 5′ or 6′ long. It has thinner stems, grows flatter on the top, and is generally less robust than the Pothos.
It isn’t as widely sold as the Pothos but is popular nonetheless. You can find it in a few variegated forms (two are listed below) but they’ll also revert to solid green in low light levels.
If you have a room with more light and want a trailing plant, consider the Philodendron Brasil or the Philodendron Silver Stripe, both varieties of the Heartleaf Philodendron.
3. Lucky Bamboo
- Botanical Name: Dracaena sanderiana
- Where to place it: On tabletops
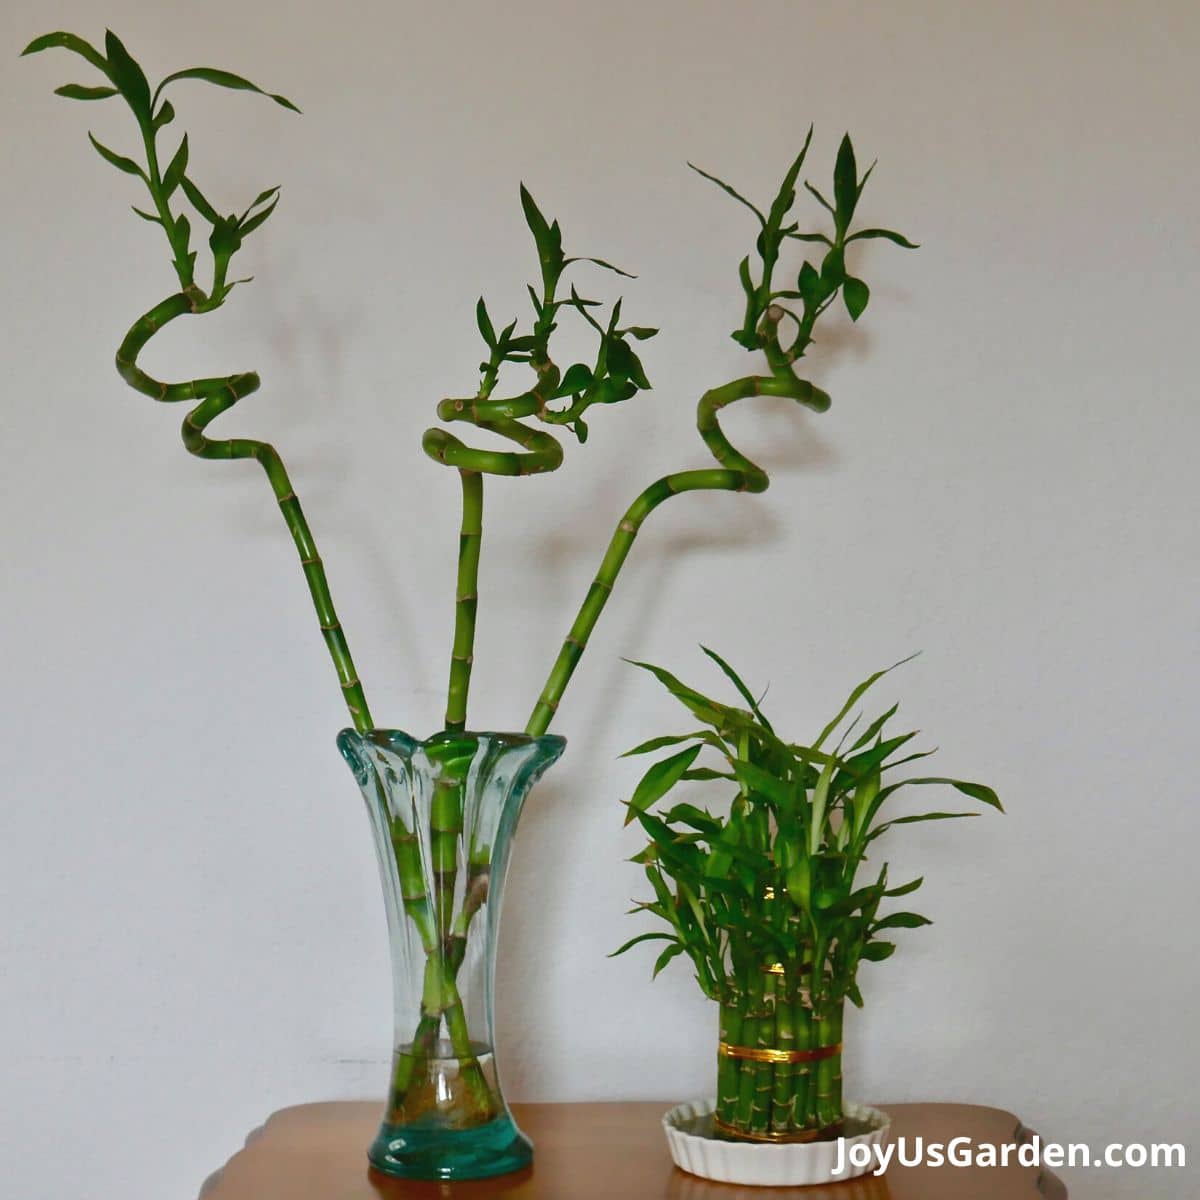
Lucky Bamboo is a winner because it grows in water for the long haul. This artistic plant also grows in soil but is more commonly seen growing in a vase, dish, or low bowl.
You can find it in many forms (mine pictured above on the left is spiral or curly and on the right a bundle) and in many different arrangements. It’s said to bring good luck and good fortune – yes, please!
If you’re interested in growing Lucky Bamboo, you’ll want to check out Lucky Bamboo Care Tips, 24 Things To Know About Caring For& Growing Lucky Bamboo, Lucky Bamboo & Spider Mites, How to Trim Lucky Bamboo
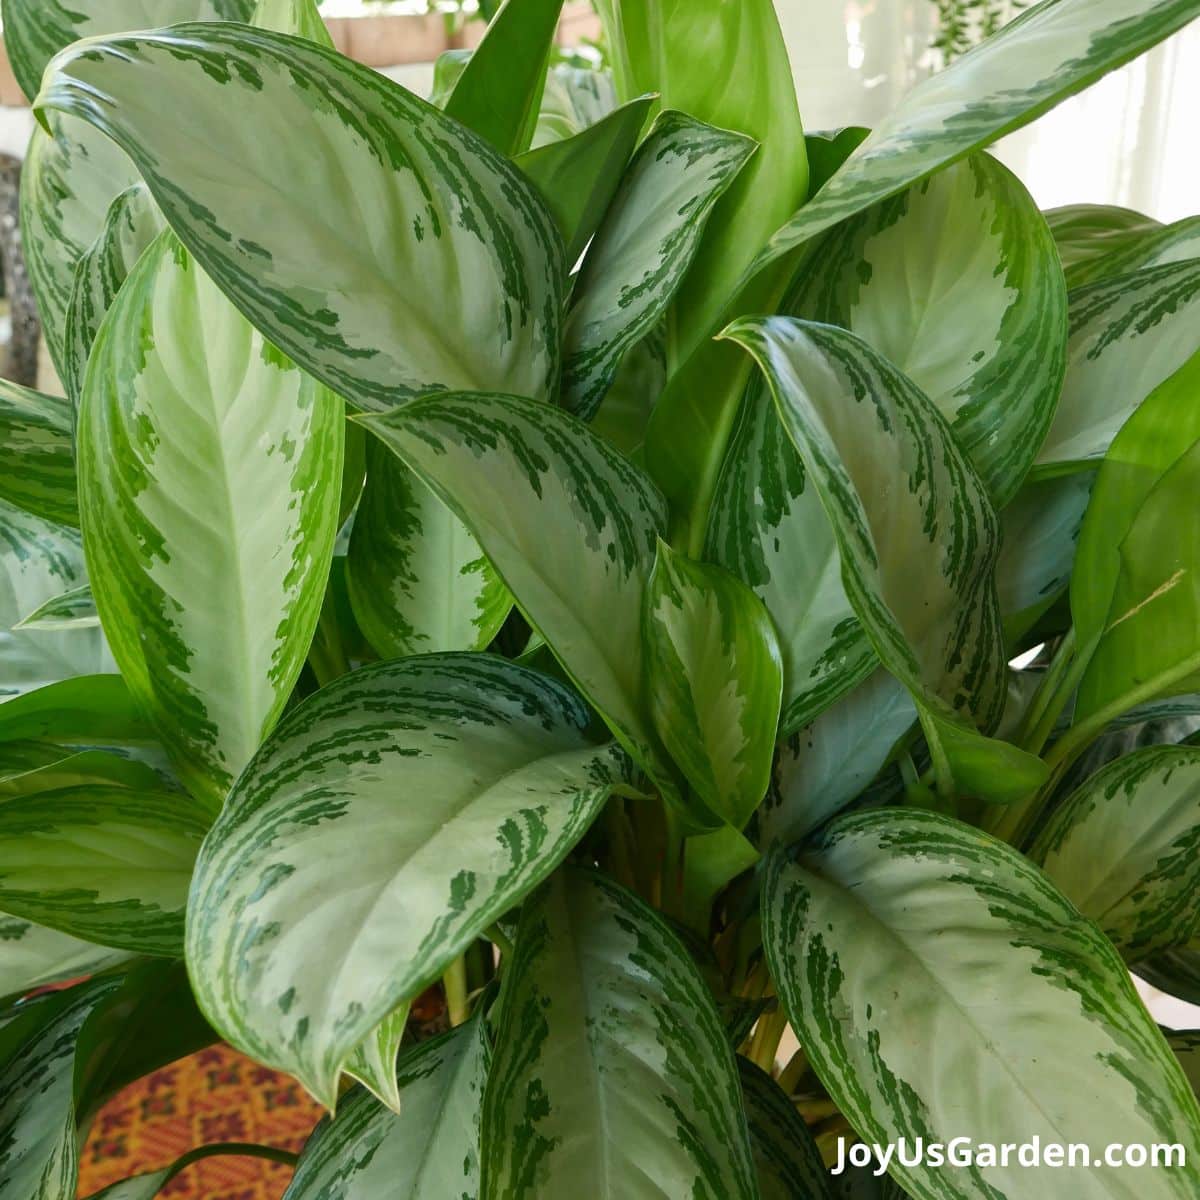
4. Aglaonema, Ag, Chinese Evergreen
- Botanical Name: Agalonema commutatum, Aglaonema spp. (several species)
- Where to place it: On tabletops or the floor
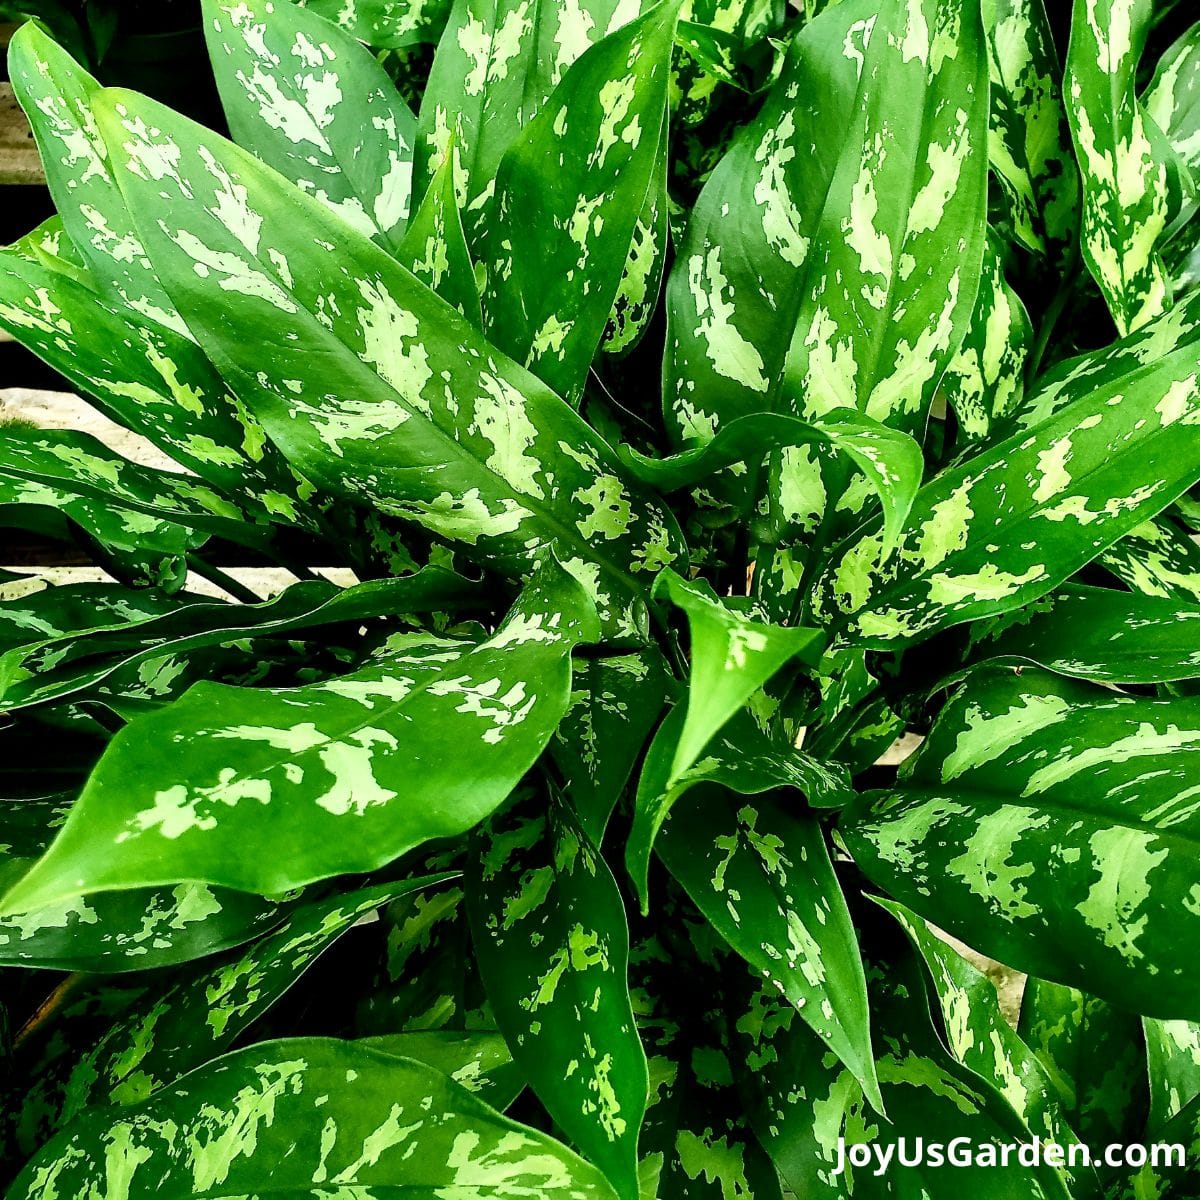
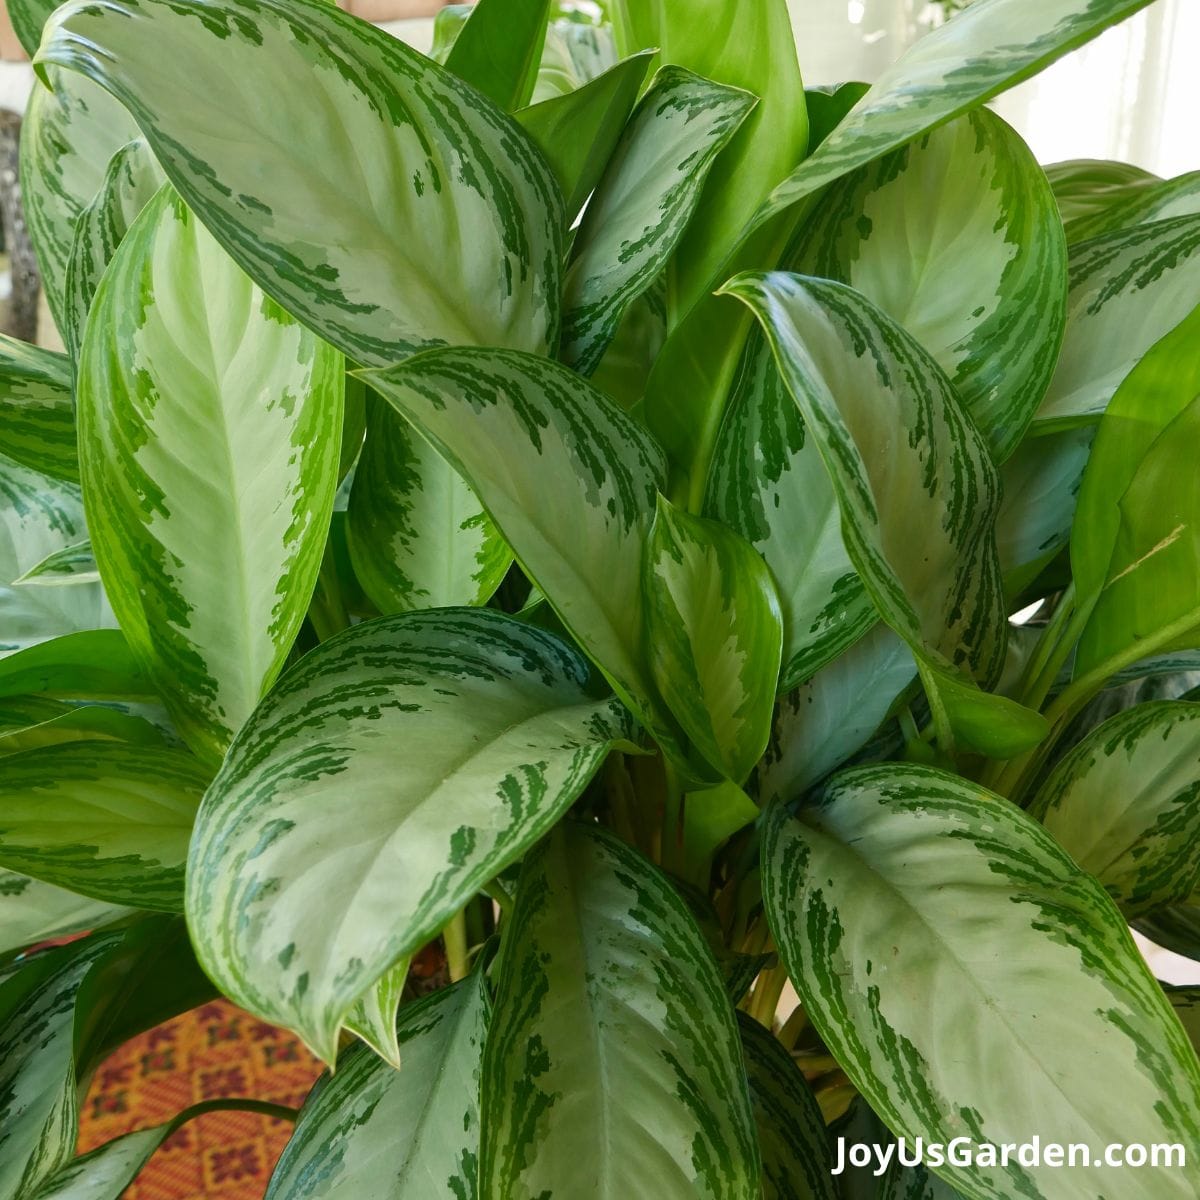
We used Aglaonemas a lot on commercial accounts because they’re pretty darned sturdy. They come in a wide variety of patterns; even some new ones splashed with pink and red.
They get as wide as they do tall, so the floor plants will be 2′ x 2′ or 3′ x 3′.
The Chinese Evergreen and Silver Queen are good old standbys that do the best in the lowest light. Silver Bay is another one.
Those with more variegation and colorful leaves, like the Siam (Red Aglaonema) and Pink Valentine (Pink Aglaonema), needs higher light exposure to keep the color in their foliage.
Here’s more information on these beautiful plants: Agalonema Care & Growing Tips. If you have spots in your home with more light, check out Red Aglaonema Care, Pink Aglaonema Care
5. ZZ Plant, Zanzibar Gem
- Botanical Name: Zamioculcas zamiifolia
- Where to place it: On tabletops or the floor

The tallest I’ve seen a ZZ Plant reach is 5′. They grow as tall as they do wide. Mine growing in the kitchen is 4′ tall x 5′ wide. The one in my bedroom (which is the offspring as a result of division) is 3′ tall x 4′ wide.
As a ZZ Plant ages and grows, it becomes much less upright and tight. The leaves arch out making quite a striking silhouette.
The foliage is a rich dark glossy green. They’re unthirsty and hardly ever show brown tips, even here in the Arizona desert.
Do you like shiny plants? This one’s for you! More on ZZ Plants here: ZZ Plant Care Tips: A Tough As Nails Glossy Houseplant, 3 Reasons Why You Need A ZZ Plant, Propagating A ZZ Plant By Division Propagating A ZZ Plant By Stem Cuttings
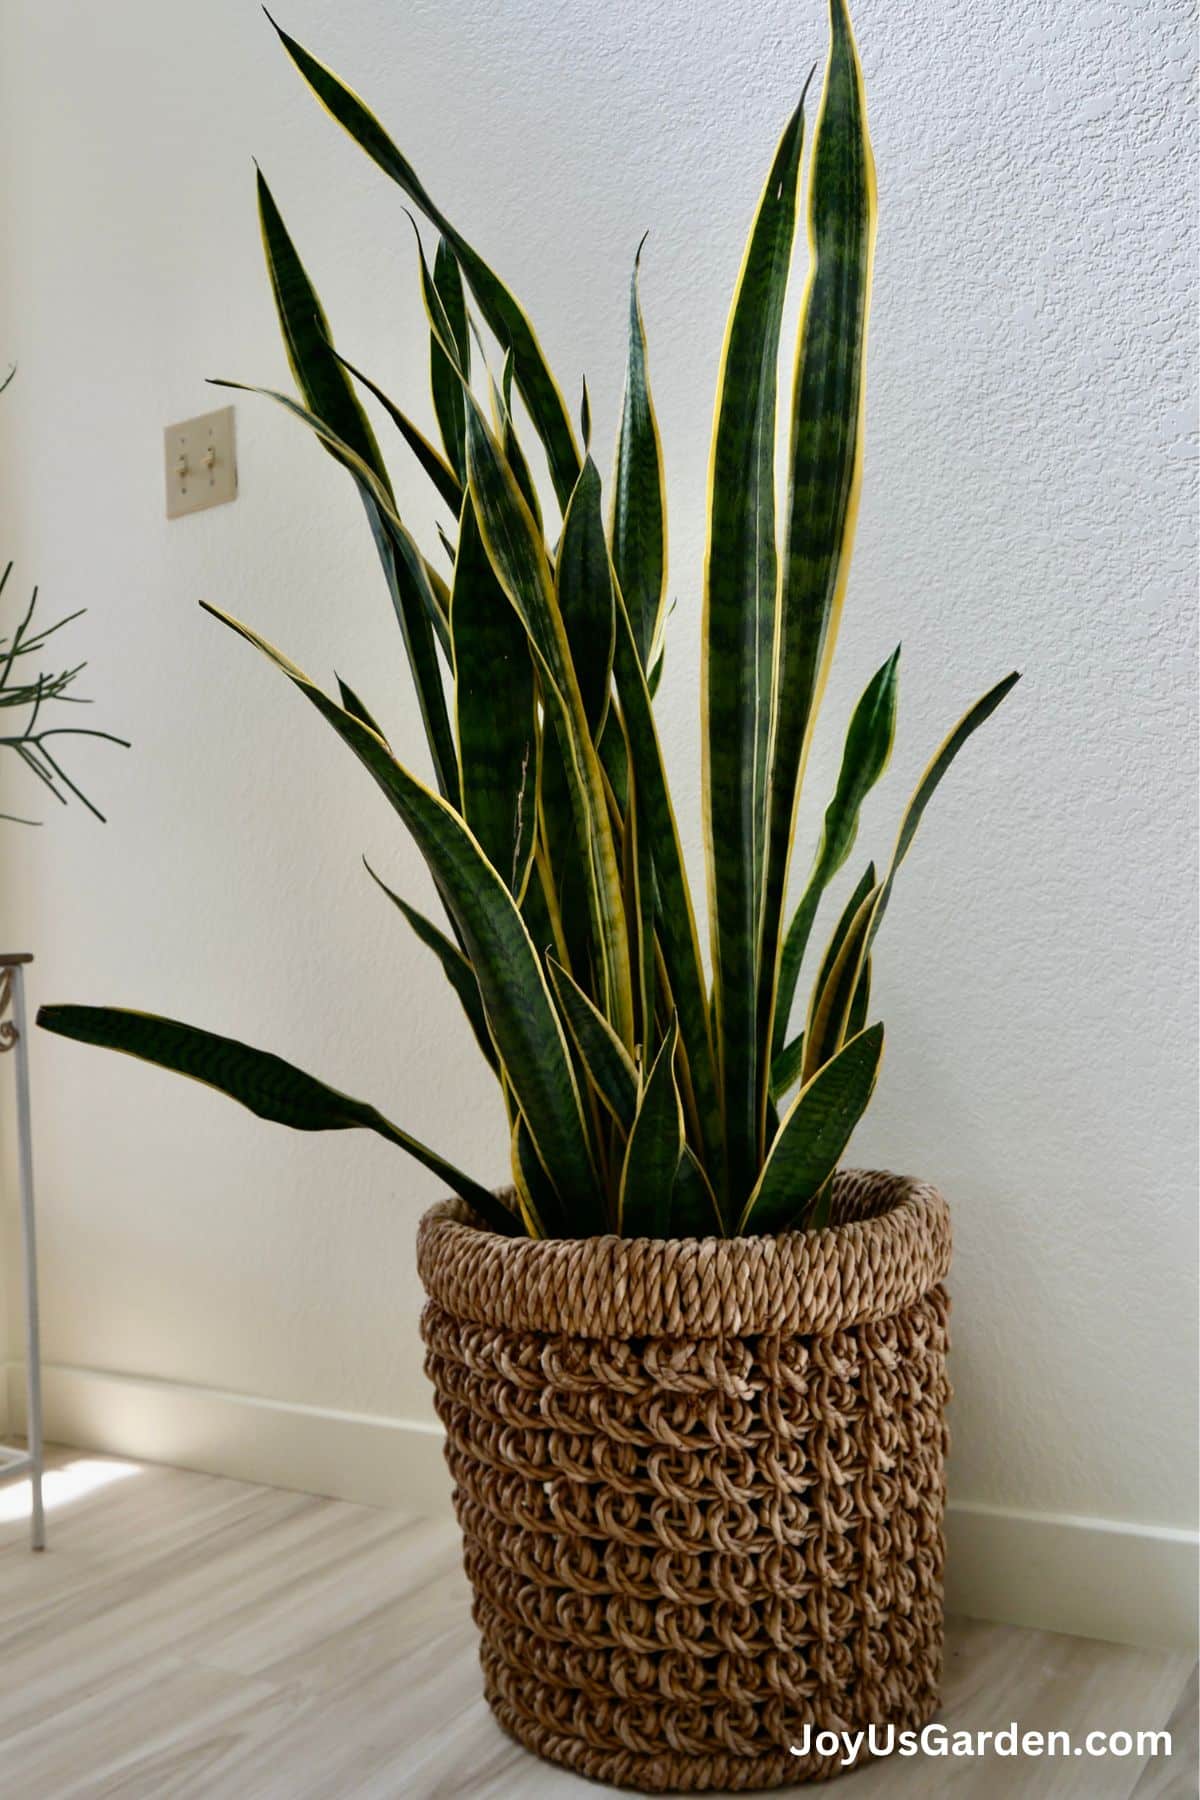
6. Snake Plant, Mother-In-Law’s Tongue
- Botanical Name: Sansevieria trifasciata, Sansevieria spp (several species)
- Where to place it: On tabletops or the floor
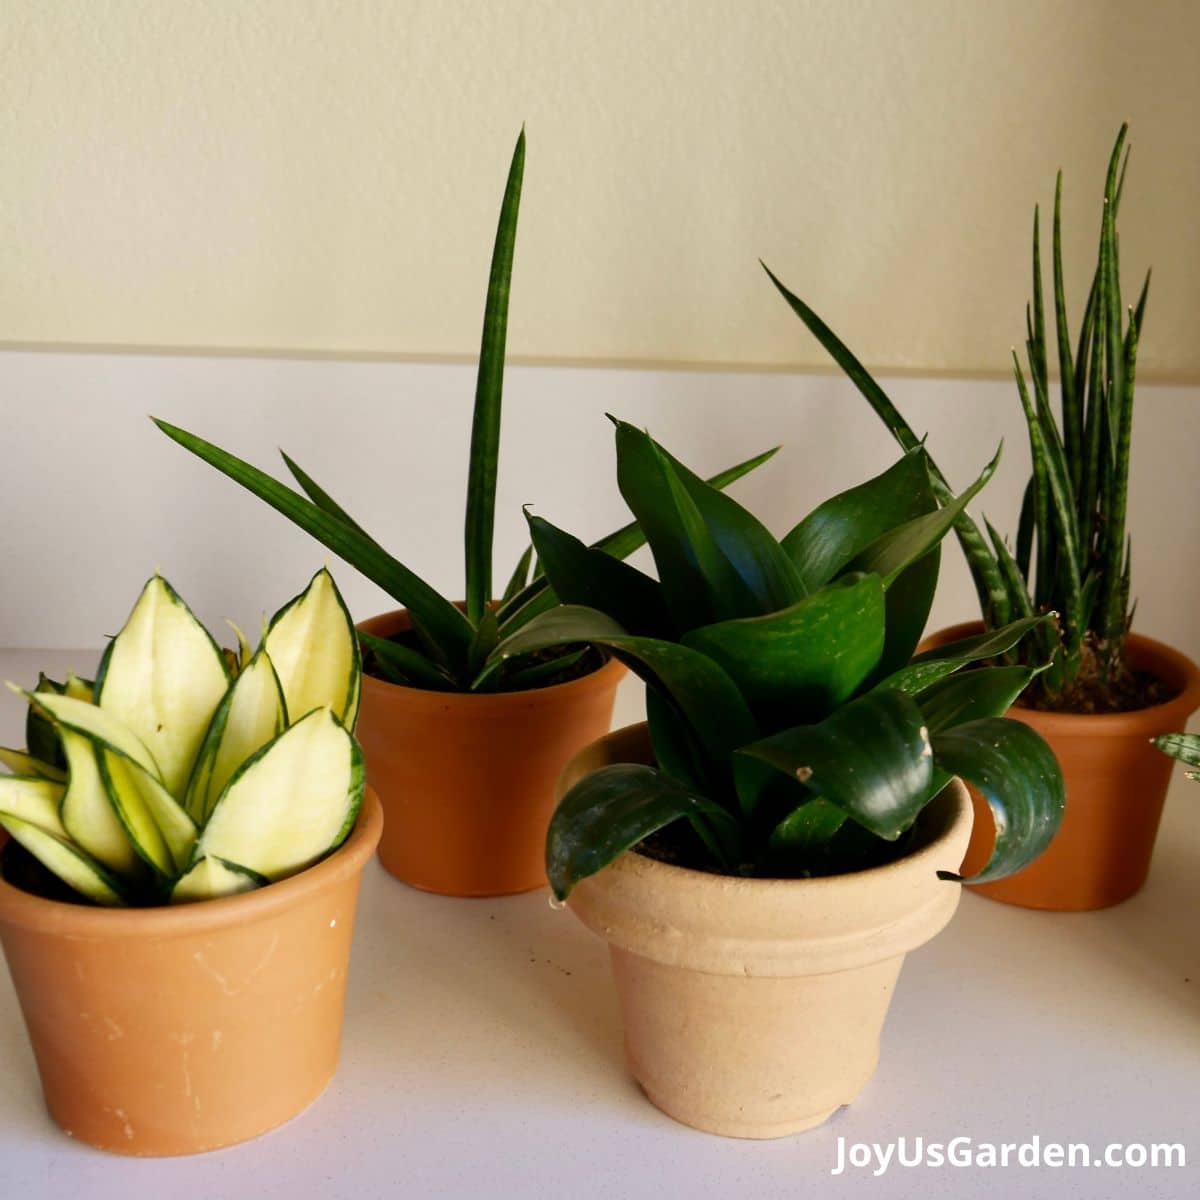
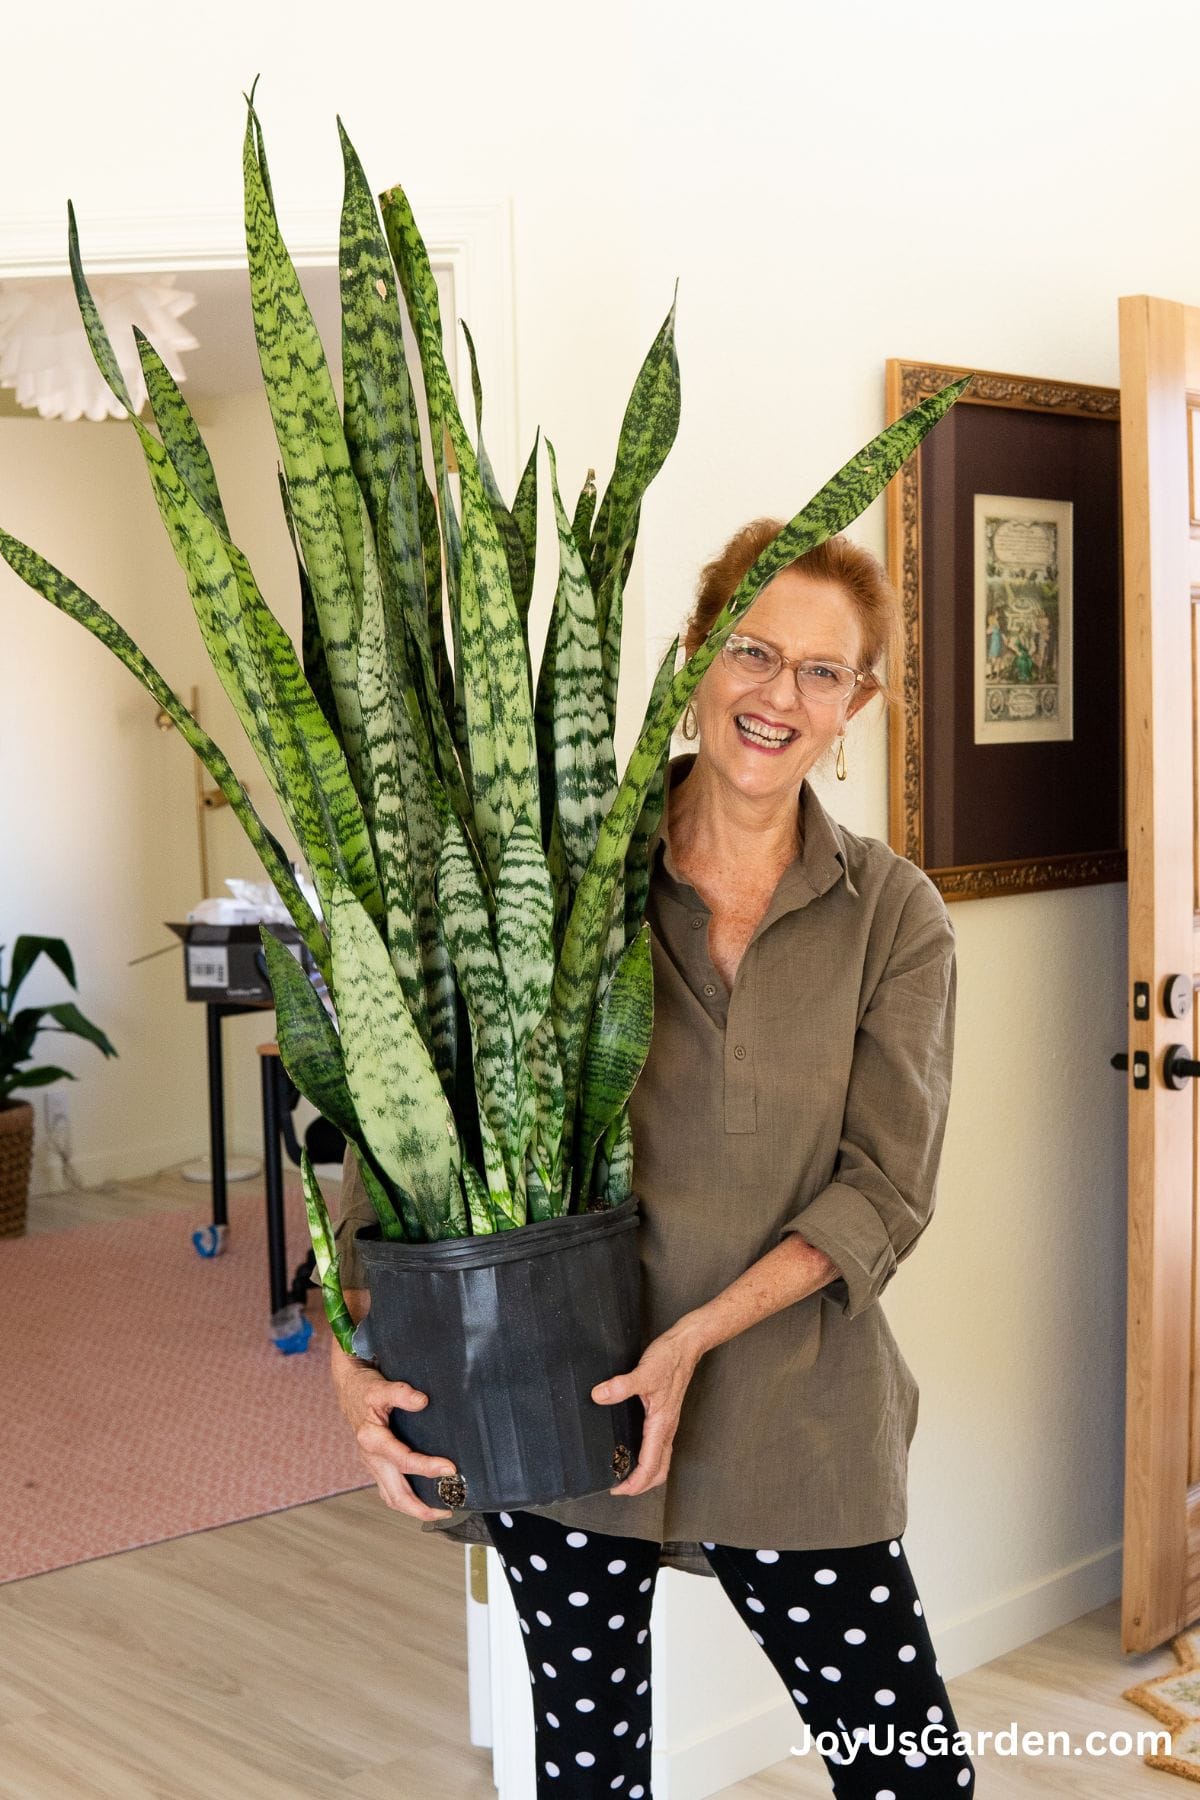
I’m addicted to Snake Plants because of how they look and especially because they’re downright tough. The less you baby them, the happier they are. They made this list of best plants for low light conditions.
This plant, along with the ZZ Plant and the Cast Iron Plant, is especially good if you travel because of its low water requirement.
There is a lot of variety in height, leaf size, and shape, as well as color and variegation for you to choose from with these plants. My Sansevieria Laurentii is 5′ tall, whereas a few of my Bird’s Nest Sansevierias are a little over 1′ tall.
Like other plants listed here, those with darker leaves and more subtle variegation will do better in lower light levels.
We’ve got you covered when it comes to growing Snake Plants: Snake Plant Care: How To Grow This Diehard Houseplant, How to Repot Snake Plants, 3 Ways to Propagate Sansevierias, Repotting Sansevieria Hahnii (Bird’s Nest Sansevieria), How To Repot A Large Snake Plant, and Snake Plants FAQs.
7. Cast Iron Plant
- Botanical Name: Aspidistra elatior
- Where to place it: On tabletops or the floor
The dark green leaves of a Cast Iron Plant (Aspidistra) shoot up like flames on skinny stems reaching 2-3′ tall. This isn’t a “glitzy” plant but it sure is a tough cookie, as evidenced by the common name.
It’s a great choice for low-light areas including dim corners, under stairs, and in hallways. Mine grows next to the desk in my office and is 3.5′ tall x 3′ wide.
There are a few shorter varieties as well as those with leaf variegations.
Some Of Our General Houseplant Guides For Your Reference: Guide To Watering Indoor Plants, Beginner’s Guide To Repotting Plants, How to Clean Houseplants, Winter Houseplant Care Guide, Plant Humidity: How I Increase Humidity For Houseplants, Buying Houseplants: 14 Tips For Indoor Gardening Newbies
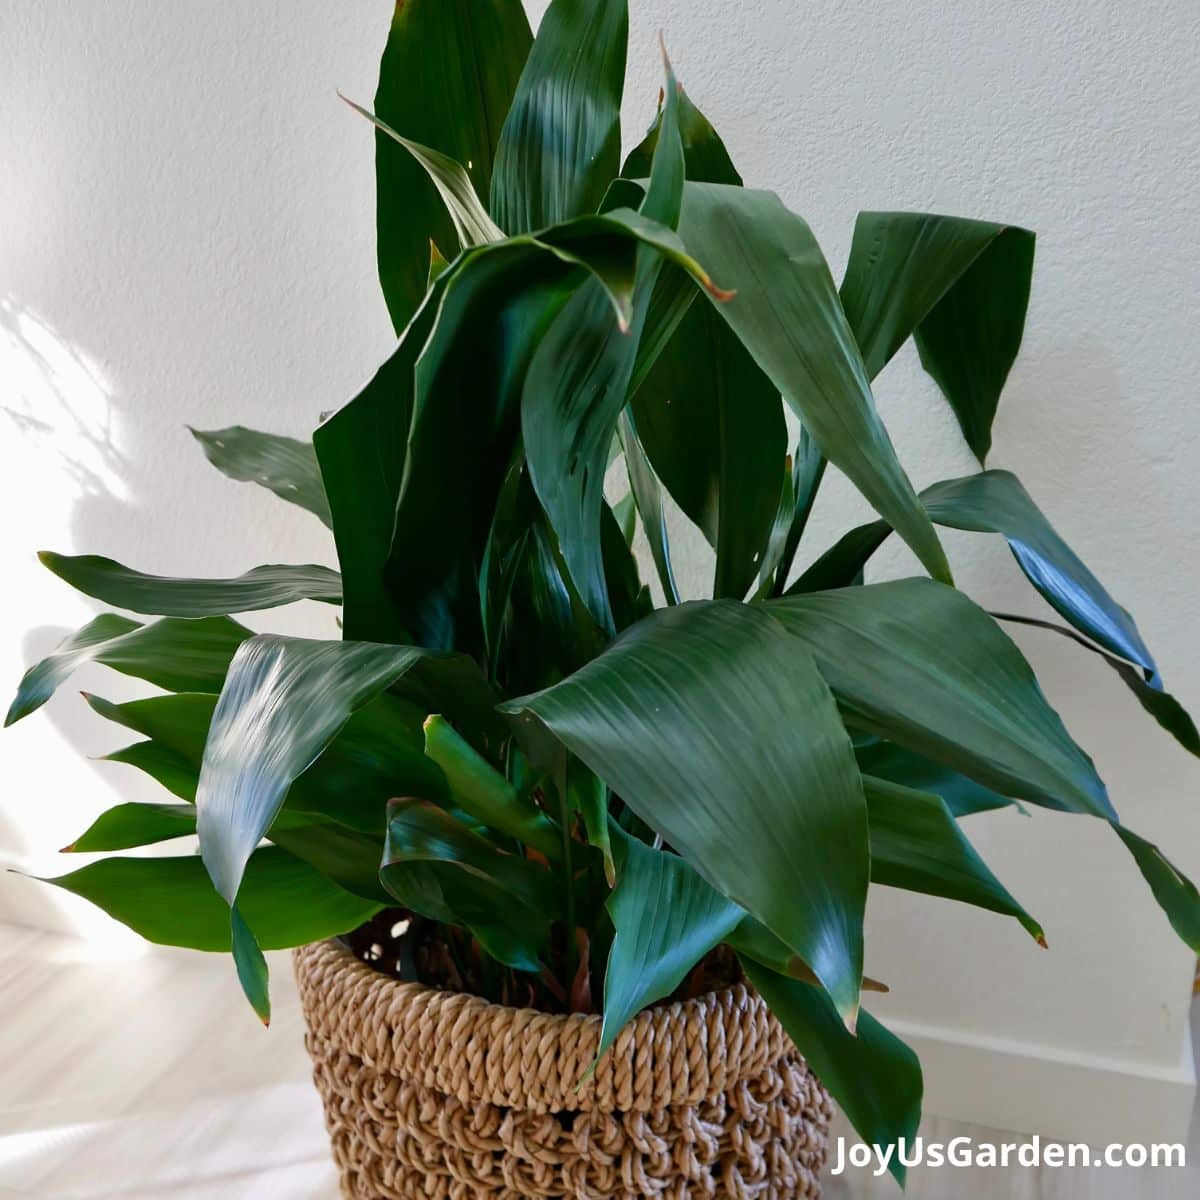
8. Darcaena Janet Craig, Dracaena Lisa
- Botanical Name: Dracaena deremensis Lisa
- Where to place it: The floor
In my days as an interior landscaper, “Janet Craig” was the only variety of this plant on the market. We put a lot of these plants in offices, malls, lobbies, and the like because of their lower light tolerance.
Now the variety “Lisa” has come on the scene and is more commonly sold. Both the “Janet Craig” and the “Lisa” have the same gorgeous glossy, dark green foliage.
They’re sold by the cane (stem), usually with 3-5 per pot so you get the foliage heads at different levels giving a staggered look.
My Dracaena Lisa growing in my living room is now 8′ tall x 5′. It does have brown leaf tips, but that’s a reaction to dry air.
Interested in how to care for this plant with its gorgeous dark green shiny foliage? Check out this Dracaena Lisa Care Guide.
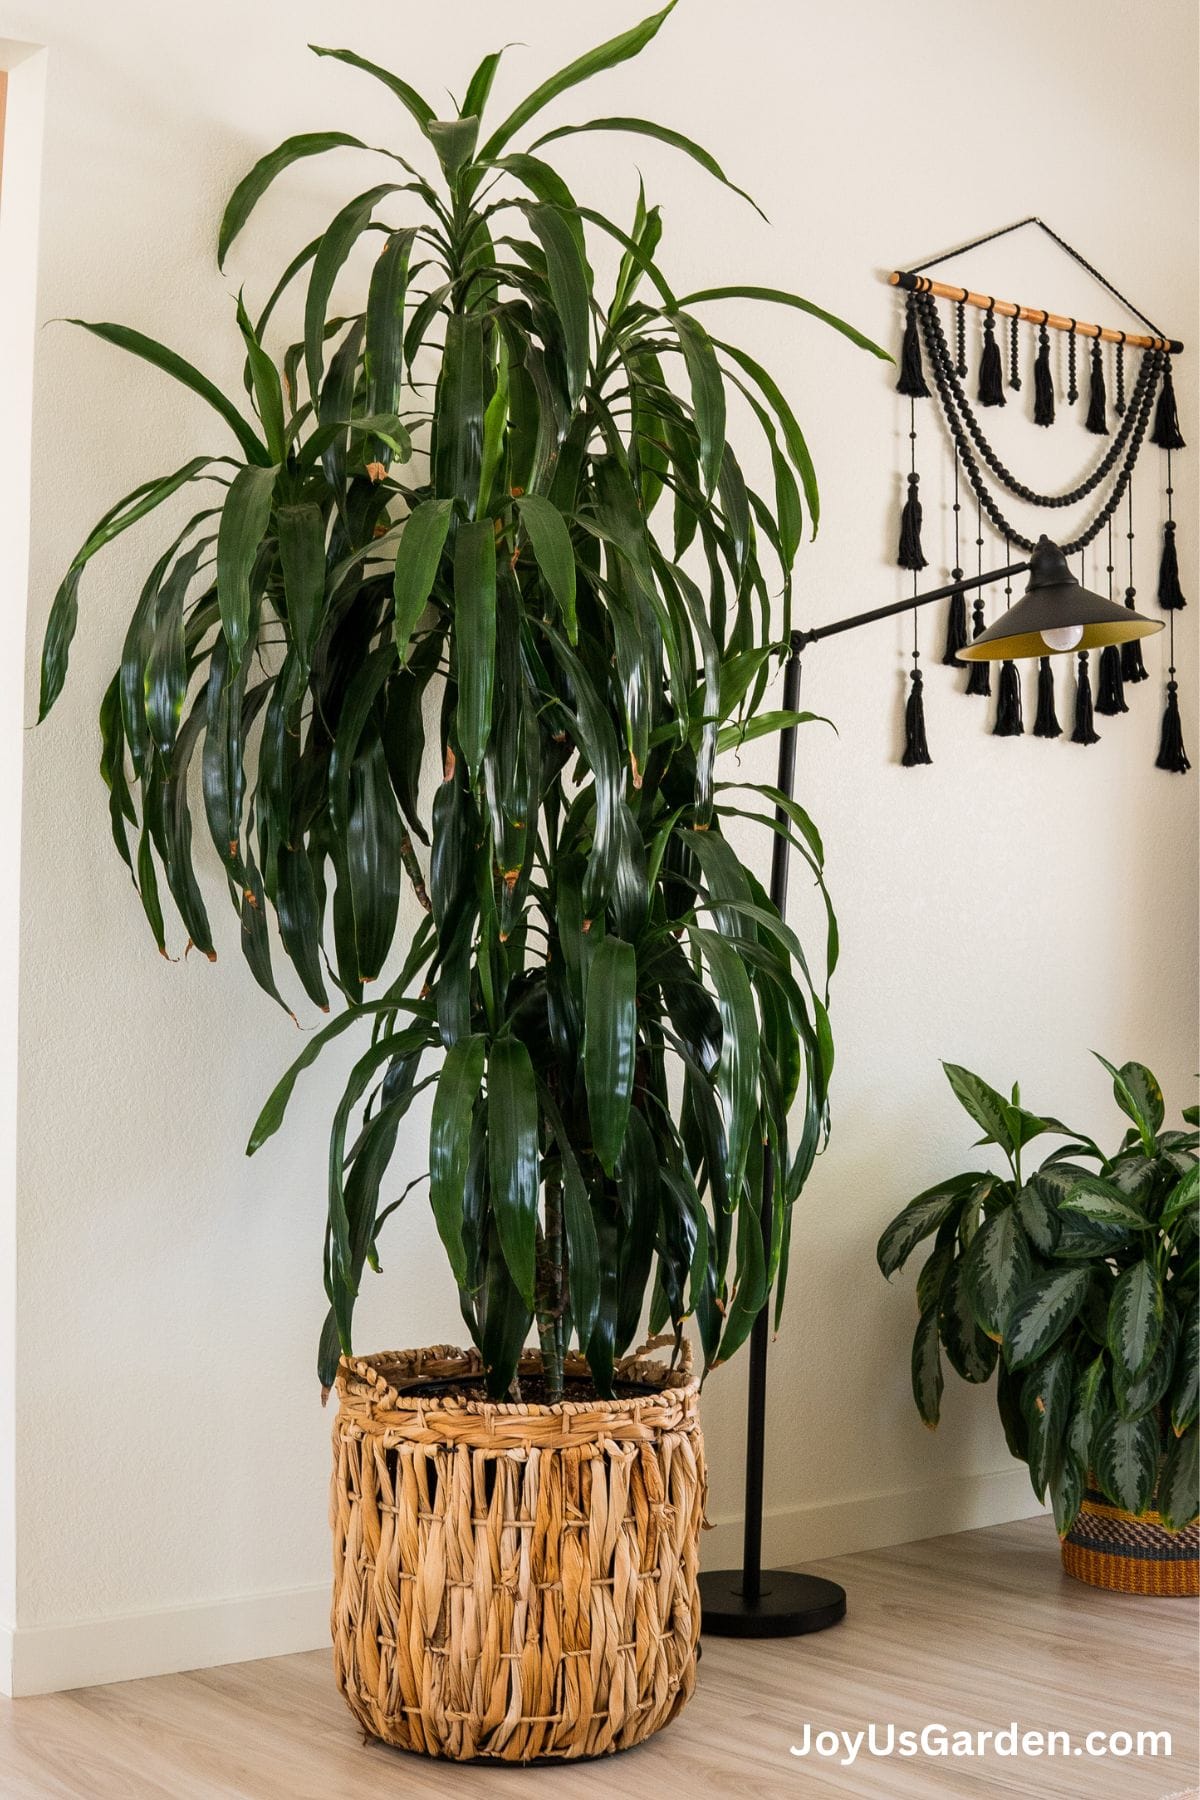
9. Dracaena fragrans
- Botanical Name: Dracaena fragrans
- Where to place it: On the floor
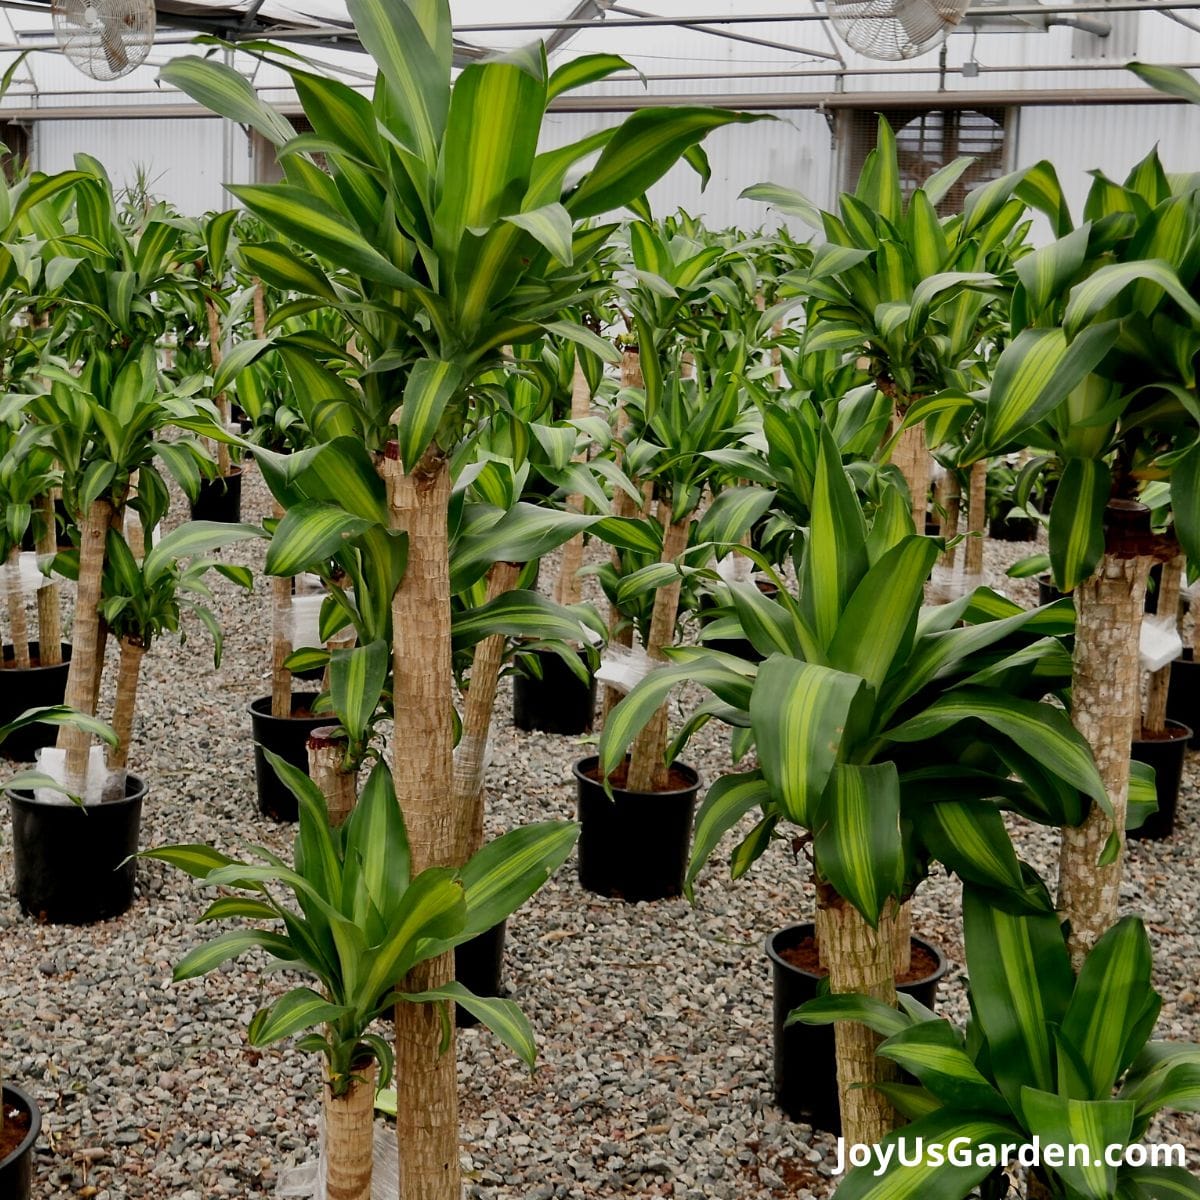
We used the Dracaena fragrans, along with the Janet Craig, quite a bit in interiors with lower light levels.
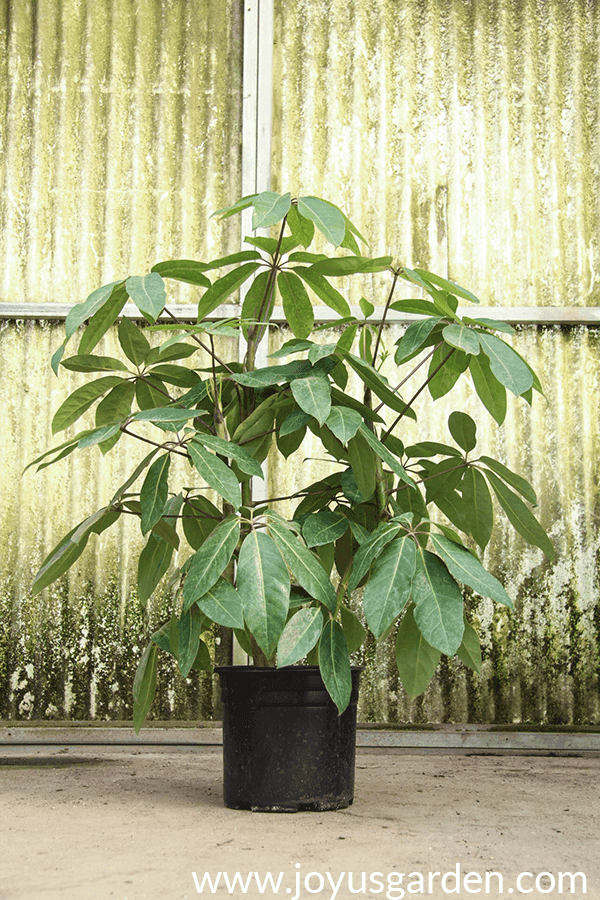
I’m having a hard time finding a picture of a Dracaena fragrans but basically, the Dracaena massangeana (the very popular Corn Plant), pictured above, is a variegated form of the solid green Dracaena fragrans.
The massangeana needs medium light to bring out the variegation in its large leaves and will revert to solid green in lower light levels. That’s the Dracaena fragrant!
Like the Dracaena Lisa, these are tall floor plants.
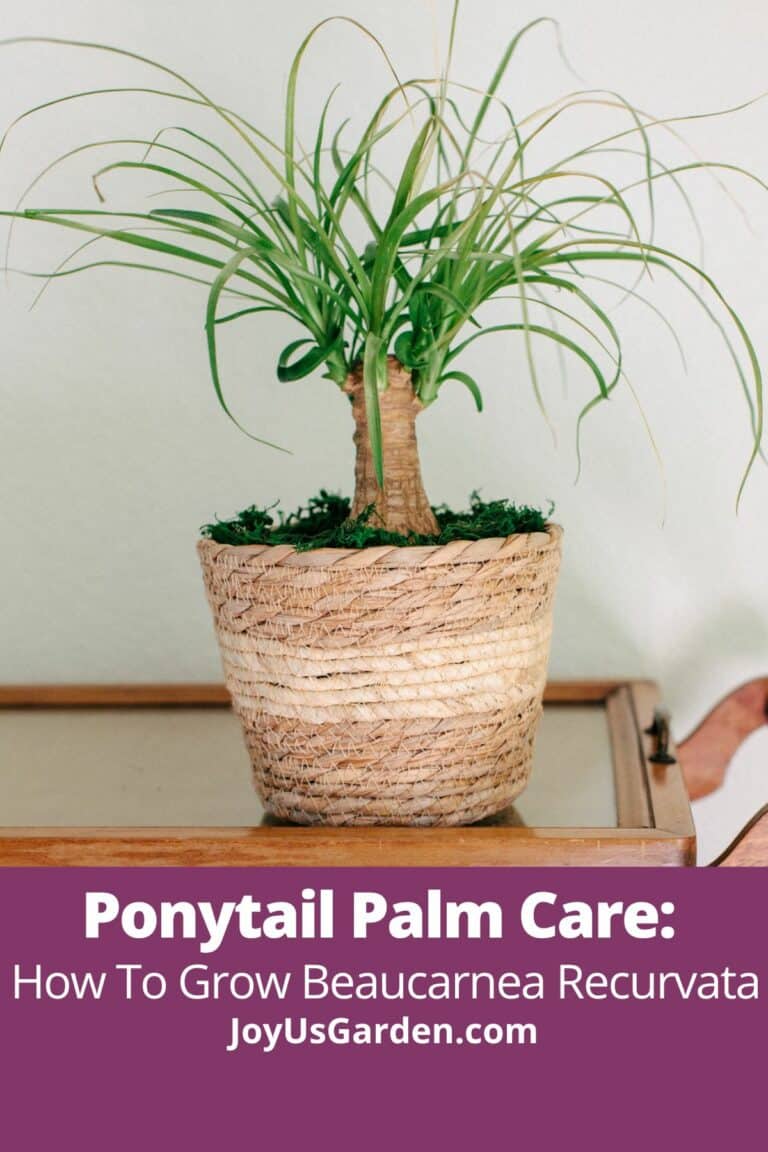
10. Kentia Palm
- Botanical Name: Howea forsteriana
- Where to place it: On the floor
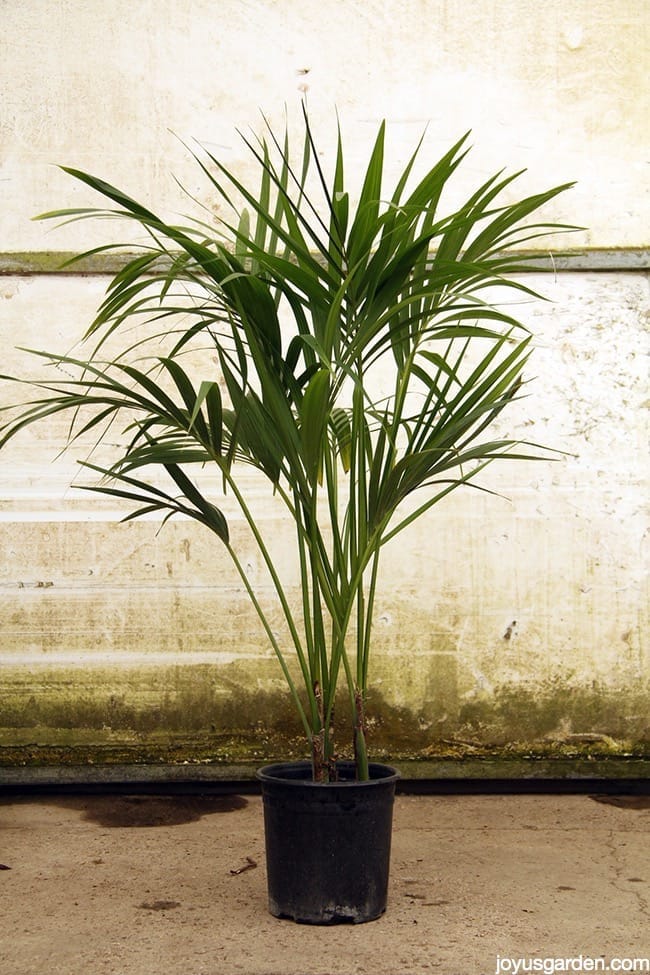
The final pick on this list of best low-light indoor plants is a stunner. This gorgeous, elegant palm arches and fans out as it grows, so it’s not one for tight spaces. The tallest I’ve seen one was 10′, and it had quite the spread.
They’re slow growing, putting out one frond (leaf) per year, so they’re more expensive than the Areca and Bamboo Palms that grow faster. We found them to be much more durable and longer lasting on commercial accounts than those two other palms, so it might be worth the investment in the long run.
I’m currently on the hunt for a 4-5′ Kentia Palm for a spot in my dining room but I haven’t come across one yet. Fingers crossed!
Get more details on how to care for this graceful plant here: Kentia Palm Care.
Low Light Indoor Plants Video Guide
Important Points On Growing Houseplants In Low-Light Conditions
- You may have to adjust the care for the darker winter months. That includes moving your indoor plant to an area with brighter light and reducing the watering frequency.
- You want to make sure your plant is growing in well-drained soil. The mix will be lighter and better aerated to prevent it from holding too much water, which could eventually lead to root rot.
- Bright indirect light is the sweet spot. Most of these plants will survive in lower light over time but will grow and look better in moderate light levels.
- Plants growing in low light will grow slower.
- If your plant is growing against a wall or in a corner, you’ll have to rotate it every few months so it receives light on all sides.
- Most importantly, you want to put the right plant in the right place. We’re glad you’re here to do some research!
I hope this list of the best low light indoor plants that are low-maintenance has helped you out. If you’re amongst the growing tribe of new plant parents, this is a good starting point.
Happy indoor gardening,

Learn more about houseplant care below!
- Easy Care Office Plants For Your Desk
- 15 Easy To Grow Houseplants
- 7 Easy Care Tabletop & Hanging Plant For Beginning Houseplant Gardeners
- 7 Easy Care Floor Plants For Beginning Houseplant Gardeners
- About the Author
- Latest Posts

Nell, the founder of Joy Us garden, was born into a gardening family and grew up in Connecticut’s countryside. After living in Boston, New York, San Francisco, & Santa Barbara, she now calls the Arizona desert home. She studied horticulture & garden design, working in the field all her life. Nell is a gardener, designer, blogger, Youtube creator, & author. She’s been gardening for a very long time & wants to share what she’s learned with you.

Hi! I just found you and I am enjoying all of your videos and knowledge! I was hoping for a video or some advice on the Monstera deliciosa plant. My mother gave me her Monstera around 15 years ago and I replanted it a while back and wasn’t very picky about what soil to replant it in. After doing some recent research on other plants I have, I’ve realized that the soil you choose is very important. After some research, I have seen lot’s of conflicting advice. Some say to make your own mix to avoid unwanted bugs and disease that can often accompany store-bought mixes. My Monstera lives indoors in my sunroom with all of my other plants, succulents and cactuses. I do not want to bring in any bugs or disease!I had looked into the Happy Frog soil but many reviewers complained of fungus gnats and thrips. 🙁 Any advice on soil? One forum I visited advised, to someone else with the same question, 4 parts peat moss to 1 part perlite. Would that be appropriate for the Monstera..? I would appreciate any advise!
I am also needing to repot my ponytail palm (I loved your video!) I know you mentioned 1 part Happy Frog to 1 part succulent/cactus mix. Same concern here with the store-bought/ Happy Frog. I have a wonderful succulent/cactus mix from a nursery. Is there another recommendation you could give in place of the store-bought potting mix? Maybe something I could make?
Same soil question for my Dracaeana Marginata. Loved your video! I need to cut mine back as you said. It is over 5 feet tall and thin on top. I never would have known this if I hadn’t seen your wonderful video. Thank you! Same soil question. You said a potting soil that drains is fine. Any recommendations or something I could make myself..?
And last question, I re-potted my snake plant and thinking that since it was in the succulent family that it was fine to use a succulent/cactus mix only. Your video shows 2/3 potting soil to 1/3 succulent/cactus mix. Do I need to re-do it and change the soil..? and if so, again, any recommendations for the portion that is the potting soil or a mix I could make myself in place of the potting soil??
Thank you in advance for your time ,
Shannan
Hi Sharon – I’ve used Happy Frog & it’s been fine. You can have that issue with any store bought mix because they tend to stay on the moist side. I now use a locally made potting soil here in Tucson which I really like. I usually recommend adding a bit of perlite or pumice to up the ante on drainage & aeration for any mix. For the PP, you can use all succulent & cactus mix if you please. Or, you could make your own blend for any of your plants & alter it for whatever your repotting. As for the Snake Plant, no you don’t. I add a little potting soil in because here in Tucson we’re so hot & dry it actually helps to retain a bit of moisture. Most people don’t need that. Hope this helps! Nell
Thank you, Nell! Yes, this helps!
Generally speaking for houseplants, when either purchasing or making your own blend, would coconut coir or sphagnum peat moss be the better choice for the base/majority of the mix before adding the perlite and your beloved addition of worm castings? 🙂 Thank you for sharing that tip, I am ordering some today!
Do you have a preference of any recommended ingredients to look for if purchasing a potting soil mix??
And, for my mother’s Monstera – any advice on soil type..? I am having trouble finding any info on that.
Thank you so much! Shannan
Pothos looks great for my dark little studio! Have a philodedron and it does pretty well in brighter rooms too, is a good 6ft long on some tendrils now, but I like the hanging look!
Hi – I love Pothos too! Mine are both trailing beautifully but will need repotting in a couple of months. They sure do brighten up a home! Nell
Thank you Nell,
Your messages help me agreat deal here at the Mediterranean coast of Turkey. I have a very small gardn and am trying to make the best of it with coloful flowers. Unfortunately with the tall and partly overhanging trees of the neigbour my garden is in the shade with only two small trees; a kumquat tree, a jujube tree and a well grown money tree (jade plant).
With all that said; could you recommend me some shade loving garden plants to go under the trees and the rest of the garden. They don’t have to be lower bearing plant but that would also help.
Yener Erguven Datca, Turkey
Hi Yener – Greetings to you in Turkey! I can’t help you out because I’m not well versed in regards to plants which grow in Turkey. Perhaps a local nursery or garden center can help you out. Nell