Propagating Bromeliads: How to Remove & Pot Up Bromeliad Pups
Bromeliads grow outdoors in temperate climates and also make wonderful and easy houseplants. They bring color and beauty into our homes and liven and brighten up whatever space they’re in. The mother plant dies after flowering but produces pups (babies) before going through that cycle. Fortunately for us they’re very easy to propagate! I want to show you how to remove and pot up bromeliad pups so your plants can live on.
The bromeliad pups are very easy to remove. You need to let them grow to a fairly good size, at least 6″ tall, so that the roots have started to form. The bigger the pups, the more root there will be. In the video, I grab them firmly at the base and pull it away from the mother while keeping a good grip on her too. You can also use a clean, sharp knife to cut the pup away. By the way, your bromeliad pups won’t flower for 3 to 6 years so don’t expect it to happen soon after the transplanting.
Some Of Our General Houseplant Guides For Your Reference:
- Guide To Watering Indoor Plants
- Beginner’s Guide To Repotting Plants
- 3 Ways To Successfully Fertilize Indoor Plants
- How to Clean Houseplants
- Winter Houseplant Care Guide
- Plant Humidity: How I Increase Humidity For Houseplants
- Buying Houseplants: 14 Tips For Indoor Gardening Newbies
- 11 Pet-Friendly Houseplants
How to remove & pot up bromeliad pups:
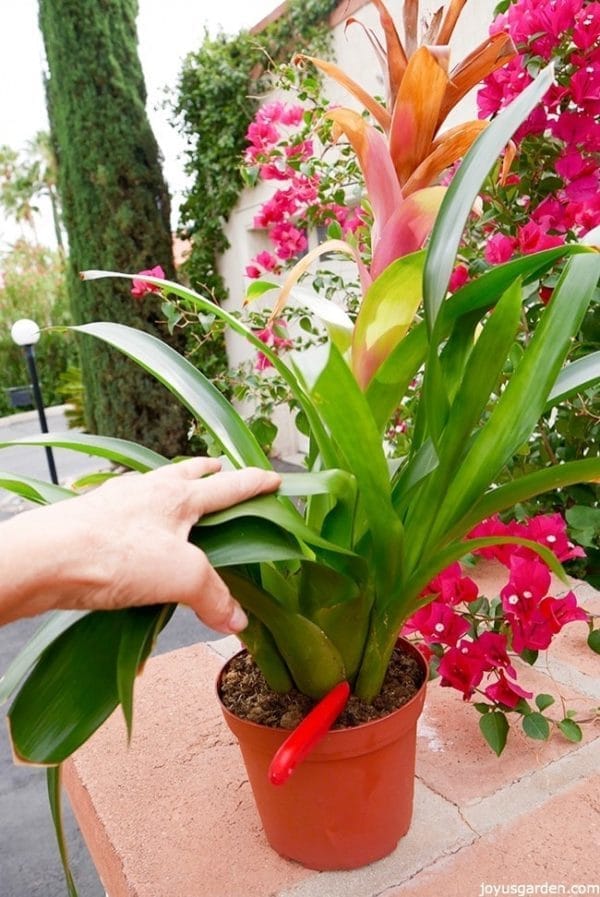
The pups on this Guzmania are a good size to remove. I’m demonstrating where you’d put the knife to cut the pup away from the mother.
You can see the Aechmea pup emerging here. It’s better to wait until it gets bigger to remove it.
Here are the steps you can follow. They are simple!
Remove the pups from the mother plant either by pulling away or cutting them off.
If the mother plant is starting to turn brown, you can either cut it all the way down or leave it as is. Some people leave it in case the mother produces more pups but I’ve never done this.
Fill the pot with a mix of 1/2 potting soil & 1/2 orchid bark.
Bromeliads are epiphytes, which means they grow on other plants in their native environments, & require excellent drainage. Because they’re not growing in soil, whatever moisture they get just washes off. The good dose of orchid bark ensures that the mix doesn’t stay too wet.
Arrange the pups in the pot however you want.
(They usually have a flat side from growing close to the mother so I face that towards the center.) You can fill in with more mix if necessary. You may have to push the pups into the mix a bit to get them to stand up. Be careful not to bury them too far down in to avoid any chance of rot.
Top with bark.
This isn’t necessary but I like the look & I think it ups the ante on the air circulation factor a bit. Bromeliads are usually found growing on trees so I feel they’re a match made in heaven when it comes to bark!
Water in well.
It should flow right out of the pot. I also put water in the urns (or cups or vases – the center well) because that’s their main method of collecting moisture.
These are the Guzmania “Jeannie” pups which I remove in the video. I bought this plant ages ago from Rainforest Flora. It was growing in my garden in Santa Barbara & I dug it out to bring here.
I put my pups in a shaded corner on the patio right off my kitchen. They’re protected from the strong desert sun and the winds which tend to whip around in the afternoon. Because it’s the end of May and temps are nearing triple digits, I water them once or twice a week. You may not need to water yours that often.
It’s nice to know that even though the bromeliad with the pretty flower you bought eventually dies, babies will appear for you to pot up and watch grow. The lineage is carried on!
Happy gardening & thanks for stopping by,

You may also enjoy:
- Bromeliads 101
- How I Water My Bromeliads Plants Indoors
- Vriesea Plant Care Tips
- Aechmea Plant Care Tips

This post may contain affiliate links, you can read our policies here.
- About the Author
- Latest Posts

Nell, the founder of Joy Us garden, was born into a gardening family and grew up in Connecticut’s countryside. After living in Boston, New York, San Francisco, & Santa Barbara, she now calls the Arizona desert home. She studied horticulture & garden design, working in the field all her life. Nell is a gardener, designer, blogger, Youtube creator, & author. She’s been gardening for a very long time & wants to share what she’s learned with you.

Thank you. Just had my first bromeliad twins! Now I know what to do with them.
Hi Linda – Great! Glad you found the info to be helpful. Nell
Hi Nell,
My Bromeliad just got 3 pups and now I know what to do when transplanting time comes, thanks to your information.
Oh great Terry. My bromeliad pups are doing great, even the one which only had 1 small root. Don’t overwater them! Nell
Beware! In Los Angeles my brother who lives in San Marino was cautioned by the local Extension office that they should remove their bromeliads because they can harbor the Zika mosquito. Check with your local Extension office.
Hi Ann – Yes, those mosquitos can lay eggs in something as small as a bottle cap full of water. People are being urged to empty bird baths, check drains, flower pots or saucers holding water, fountains, decorative ponds, etc. Bromeliads hold water in their vases so they fall into that category. Nell
When I got my Bromeliad it was only a little pink. I’ve had it about 2 months. I live in Michigan, so I’m growing in my basement under grow lights which stay on 11 hours. Temp is approximately 65 degrees in the basement. The plant is slowly losing its color including the green, becoming more of a light brown. I’ve watered it twice since I got it. No pups at this time.
Vicky – Many bromeliads come from the nursery with a pup or 2 on them. I’m not sure if the flower or the foliage is loosing color & what bromeliad you have. Could be the natural life cycle of the flower or it’s not getting enough light. Nell
Thank you so very much for the video on how to separate and pot Bromeliads. New owner, I live in an apartment. I was wondering if I should get a humidifier. Also, for 3 pups in one pot, what size do you recommend? Its a mouth full and I apologize. Again, thank you.
Hi Gigi – Bromeliads tolerate dry air surprisingly well. I live in the Arizona desert & some have a bit of brown tipping but that’s it. Bromeliads don’t have an extensive root system so the smaller ones don’t need a bit pot. A 6-8″ pot will do just fine. Nell
Hi. Great article. I received one as a Christmas gift. What is the best way to remove a dried bloom and how do you do it? Thanks
Thanks Cathie. Here’s a post with info on that: https://www.joyusgarden.com/bromeliad-flowers-turning-brown-why-it-happens-what-to-do-about-it/ Nell
Thank you Nell. I have a Mother and 4 largish pups, and now feel more confident about separating them–thanks again! Great video–
Oh great Lynn – thanks for the comment! Even if you the pups only have a very small root system, I’ve found they settle in & grow just fine. Nell
Thank you for the info! I planted my newly removed pup about three weeks ago. It looked like it was going ok until I noticed some sort of worms in the vase (mesq. larvae?). When I tipped it over to flush it out I noticed the base was squishy and water logged and it just popped right off and was rotten. The outside looked fine. Can they rot from the inside? I have a pink vase plant and live in fl. Plant is kept outside in a pot.
Hi Rose – Yes, that was probably mosquito larvae. The same happened to me late last summer. They can rot from the inside & I call it “mushing out”. I know yours was growing outside but I tell folks to keep the vases no more than 1/4 full indoors to prevent this. Nell
I have two 3 inch & 2i nch pups. The mother plant died away from the little pups. They don’t have roots but I put them in moist soil anyway.
Will they survive.
Celia – They should. I’ve successfully rooted pups which weren’t showing roots. Use a proper mix & don’t over water. Nell
Hi Joy,
I was just wondering if you have to remove the pup plants? or if you can just leave them to grow?
Hi Matthew – Yes, you can just leave them to grow. You can eventually cut the dead mother plant back. Nell
I have a beautiful Bromeliad that now has 6 pups growing. I’m so excited and I would like to remove the pups the best way I can. Thank you for your video.. I’ll take all the advise I can get.
help! I accidentally broke off all 3 pups from the roots when I was seperation… will they survive? they are big too at least 6 inches?